Tuesday, September 16, 2008

spreading boards


picture: Mr Johari Jalinas

Spreading boards

All insects preserved with the wings spread uniformly are set and dried in this position on spreading boards or blocks

Monday, September 15, 2008

Double Mounts


Insects that are too small to be pinned directly on standard pins and yet should be preserved dry may be pinned as double mounts. This term refers to the insect’s being mounted on a minuten or card point, which in turn is mounted or attached to a standard insect pin . Minutens are available from supply houses in 10 and 15- mm lengths and in two or three thicknesses. They are finely pointed at one end, headless on the other, and generally of stainless steel. Double mounts are assembled by inserting the minuten into a small cube of soft, pithy material such as fine cork, balsa wood, fine-textured plastic, or polyporus, which is a pure white material obtained from a bracket fungus. Polyporus traditionally has been a favorite material, but it is expensive and difficult to obtain, especially in America.

Many entomologists prefer silicone rubber, obtained from plastics suppliers and made into plaques by pouring the polymerized material, a thick creamy liquid, into a flat- bottomed plastic container to a depth of about 2.5 mm and allowing it to solidify for several hours. It may then be lifted easily from the mold and cut with a sharp knife or razor blade into square strips and finally into cubes. With most materials, the minuten must be inserted point first, but with silicone rubber it may be inserted dull end first until it strikes the surface on which the cube is Iying, and it will be held firmly. Minutens should be handled with forceps; they are so small that even the unsharpened end can easily pierce a finger.

It is possible, and sometimes preferable, to mount an insect on a minuten before inserting the minuten into the mounting cube; however, it is most convenient to prepare a series of minuten mounts beforehand, already attached to standard No. 3 pins. To mount extremely small insects, such as tiny parasitic wasps, on minutens, pick up a droplet of cement with the prepared minuten and simply place the tip of the minuten with the cement on it between the base of the insect legs or on the right side of the thorax. In mounting an insect on a minuten, the pin need extend no more than barely through the insect. If the insect is lying on a glass surface when it is pierced with the minuten, a little extra pressure will curl the point of the minuten back into the insect and insure that the specimen will not come off the minuten.

Many entomologists prefer to mount insects on a minuten in a vertical position in a short strip of polyporus or silicone, with the minuten therefore parallel to the main pin. The insect lies sidewise in the finished mount, in an excellent position for examination under a microscope, and is less liable to damage in handling than it would be otherwise.

Card points are slender little triangles of stiff paper. They are pinned through the broad end with a No. 2 or 3 insect pin, and the insect is then glued to the point. Card points may be cut with scissors from a strip of paper; they should be no more than 12 mm long and 3 mm wide. However, a special punch for card points, obtainable from entomological supply houses, will make better, more uniform points. Card points should be made only from good quality paper, as good as or better than that used for data labels . If specimens are in good condition and are well prepared, they may reasonably be kept in museum collections for a long time, perhaps even for centuries. Much of the paper in common use does not have that kind of life expectancy; it becomes yellow and brittle with age. Paper made especially to last, such as that used for herbarium sheets in botanical collections, is highly recommended.

Specimen placement on the pin


Proper specimen placement on the pin. A) correct height and position. B) Specimen too low on pin. C) Specimen improperly tilted on pin.

Pin placement for mounting various types of insects


Diagram showing the proper pin placement for mounting various types of insects

Standard methods of pinning some of the commoner types of insects are as follows:

(1) Orthoptera—Pin through back of thorax to right of midline (A—B). For display purposes, one pair of wings may be spread as shown, but many orthopterists prefer to leave wings folded because of limited space in most large collections (see Beatty & Beatty 1963).

(2) Large Heteroptera—Pin through triangular scutellum to right of midline (C). Do not spread wings. In Reduviidae, Coreidae, and other slender forms, pin through back of prothorax to right of midline.

(3) Large Hymenoptera and Diptera—Pin through thorax between or a little behind base of forewings and to right of midline (D). So that no characters on body are obscured, legs should be pushed down and away from thorax, and wings turned upward or sidewise from body. Wings of most Diptera will flip upward if specimen is laid on its back before pinning and pressure is applied simultaneously to base of each wing with pair of blunt forceps. Wings should be straightened if possible so venation is clearly visible. Folded or crumpled wings sometimes can be straightened by gentle brushing with a camel’s hair brush dipped in 70 percent alcohol. For Hymenoptera wings, Peterson’s XA mixture (xylene and ethanol, equal parts by volume) is recommended.

(4) Large Coleoptera—Pin through right wing cover near base such that the pin exits through the metathorax (between the middle and hind legs) (E). Do not spread wings.

(5) Large Lepidoptera and Odonata—Pin through middle of thorax at thickest point (F) or just behind base of forewings (G)

Sunday, September 14, 2008

Preparing Dry Specimens for Mounting

Any dry insect that is to be pinned must be relaxed, that is, remoistened enough to soften so that it will not break when the pin is inserted or so that parts of the specimen may be rearranged or repositioned. Insects, especially Lepidoptera, that are to have their wings spread should be relaxed even if they have been killed for only a short time.

The muscles of Lepidoptera, once the stiffening of rigor mortis sets in, which occurs in a matter of minutes, are strong enough so that adjustment of the wings is difficult, but treatment in a relaxing chamber usually will make this procedure much easier. Eight hours in a relaxing chamber should suffice, but larger specimens may require 24 hours or more. Simply leaving specimens in a cyanide jar for awhile sometimes will relax them, but this method is not reliable

Mounting Specimens


Commonly used specimen mounting tools include a pinning block, forceps, pins, points, glue, and scisssors

Specimens are mounted so that they may be handled and examined with the greatest convenience and with the least possible damage. Well-mounted specimens enhance the value of a collection; their value for research may depend to a great extent on how well they are prepared.
Standardized methods have evolved over about 2 centuries in response both to the aesthetic sense of collectors and to the need for high quality research material.

Specimens to be prepared for a permanent collection may be fresh, that is, their body tissues not yet hardened or dried; or they may have been in temporary storage and must be specially treated before mounting. Dry specimens usually must be relaxed, and those preserved in liquid must be processed so that they will dry with minimal distortion or other damage.

Preservation for Molecular Studies

Systematists are increasing using molecular methods to study insect relationships, make identifications, and determine species limits. Some of these techniques, such as study of cuticular hydrocarbons, can be used on dried insects, even those stored in museum collections. However, many others require that specimens be treated so that DNA or other molecules are preserved. In general, specimens for molecular work should be collected in 95% or absolute (100%) ethanol (ethyl alcohol). It is best if specimens are thoroughly dehyrated by changing the alcohol at least a couple of time before the specimens are stored for any length of time. It is also advisable to keep specimens cold (frozen if possible). For more detailed information on specimen preservation for molecular work.

Temporary Storage of Specimens-Papering


Lepidoptera temporaily stored in paper and glassine.

Papering consists of placing specimens with the wings folded together dorsally (upper sides together) in folded triangles or in small rectangular envelopes of glassine paper, which are the translucent envelopes familiar to stamp collectors. Glassine envelopes have become almost universally used in recent years because of the obvious advantages of transparency and ready availability.

In many collections, glassine has become partly superseded by plastic. However, many collectors still prefer folded triangles of a softer, more absorbent paper, such as ordinary newsprint, and believe they are superior for preserving specimens. Specimens can become greasy after a time, and the oil is absorbed by paper such as newsprint but not by glassine. Moreover, glassine and plastic are very smooth, and specimens may slide about inside the envelopes during shipping, losing antennae and other brittle parts. Although softer kinds of paper do not retain creases well when folded, this shortcoming may be circumvented by preparing the triangles of such material well before they are needed and pressing them with a weight for a week or so. Triangles are easy to prepare.

Some Lepidoptera are most easily papered if first placed in a relaxing box for a day or two. The wings, often reversed in field-collected butterflies, may then be folded the proper way without difficulty. Do not pack specimens together tightly before they are dried or the bodies may be crushed. Do not store fresh specimens immediately in airtight containers or plastic envelopes or they will mold. Write collection data on the outside of the envelopes before inserting the insects

Temporary Storage of Specimens-Dry preservation

It is standard practice to place many kinds of insects in small boxes, paper tubes, triangles, or envelopes for an indefinite period, allowing them to become dry. It is not advisable to store soft—bodied insects by such methods because they become badly shriveled and very subject to breakage. Diptera should never be dried in this manner because the head, legs, and most of all the antennae become detached very easily.

Almost any kind of container may be used for dry storage; however, tightly closed, impervious containers of metal, glass, or plastic should be avoided because mold may develop on specimens if even a small amount of moisture is entrapped. Nothing can be done to restore a moldy specimen. Dry-stored specimens must be labeled with complete collection data in or on each container. Avoid placing specimens collected at different times or places in the same container. If specimens with different collection data must be layered in the same container, include a separate data slip with each layer.

To insure that specimens do not slip from one layer to another, cut pieces of absorbent tissue, glazed cotton, or cellucotton a little larger than the inside of the container. Place a few layers of this material in the bottom of the container, then a few insects (do not crowd them), then more layering material, and so on until the container finally is filled. If much space is left, use a little plain cotton, enoush to keep the insects from moving about but not enough to produce pressure that will damage them. To prevent parts of the insects from getting caught in the loose fibers, use plain cotton only for the final layer. Insect parts are very difficult to extract from plain cotton without damage.

One method of keeping layered specimens soft and pliable for several months includes the use of chlorocresol in the bottom of the layered container and a damp piece of blotting paper in the top. The container must be impermeable and sealed while stored; plastic sandwich boxes make useful containers to use with this method. Add about a teaspoonful of chlorocresol crystals to the bottom, cover with a layer of absorbent tissue, follow with the layers of specimens, then a few layers of tissue, and finally a piece of dampened blotting paper as the top layer. The cover is then put in place and sealed with masking tape. It is best to keep boxes of layered specimens in a refrigerator.

Temporary Storage of Specimens-Refrigeration and Freezing

Refrigeration and Freezing

Medium to large specimens may be left in tightly closed bottles for several days in a refrigerator and still remain in good condition for pinning as will smaller specimens if left overnight. Some moisture must be present in the containers so that the specimens do not become “freeze-dried,” but if there is too much moisture, it will condense on the inside of the bottle as soon as it becomes chilled. Absorbent paper placed between the jar and the insects will keep them dry. When specimens are removed for further treatment, place them immediately on absorbent paper to prevent moisture from condensing on them.

Insects may be placed in alcohol, as described previously, and kept for several years before they are pinned or otherwise treated. However, it has been shown that many insects, especially small ones, can deteriorate in alcohol stored at room temperature. Long term storage of specimens that suffer from this kind of deterioration can be lessened by storing the containers in a freezer. Even though the alcohol will not freeze at the temperatures obtained by most ordinary freezers, the lower temperature seems to slow or stop deterioration of the specimens.

Specimen Preservation-Larvae

Larvae of most insects should be collected in alcohol and subsequently killed in boiling water to “fix” their proteins and prevent them from turning black. Larvae should be left in hot water for 1-5 minutes, depending on the size of the specimens, then transferred to 70-80 percent alcohol. Large specimens or small specimens that have been crowded into one vial should be transferred to fresh alcohol within a day or two to reduce the danger of diluting the alcohol with body fluids. If the alcohol becomes too diluted, the specimens will begin to decompose. Water is not a preservative

Specimen Preservation-softbodied insects

Softbodied insects, such as aphids and thrips, small flies, and mites, become stiff and distorted if preserved in 95 percent alcohol and should be preserved in alcohol of a lower concentration.

Thrips and most mites, for example, are best collected in an alcoholglycerin- acetic acid (AGA) solution, and for many larvae a kerosene-acetic acid-dioxane (KAAD) solution is preferred. If KAAD is used, larvae need not be killed in boiling water.

Larvae and most soft-bodied adult insects and mites can be kept almost indefinitely in liquid preservatives; however, for a permanent collection, mites, aphids, thrips, whiteflies, fleas, and lice usually are mounted on microscope slides . Larvae are usually kept permanently in alcohol, but some may be mounted by the freezedrying technique or by inflation

Specimen Preservation-Hymenoptera

Parasitic Hymenoptera are best killed and preserved in 95 percent alcohol. This high concentration prevents the membranous wings from becoming twisted and folded, hairs from matting, and soft body parts from shriveling. This concentration may also be desirable if large numbers of insects are to be killed in a single container, such as in the killing jar of a Malaise trap, because the insect body fluids will dilute the alcohol

Special Problems and Precautions in Rearing.

Problems may arise in any rearing program. Cannibalism, for instance, is a serious problem in rearing predaceous insects and necessitates rearing specimens in individual containers. Some species resort to cannibalism only if their cages become badly overcrowded. Disease is also a problem. It can be caused by introducing an unhealthy specimen into a colony, poor sanitary conditions, lack of food, or overcrowding.

Cages should be cleaned frequently and all dead or unhealthy specimens removed. Use care not to injure specimens when transferring them to fresh food or when cleaning the cages. Mites and small insects can be transferred with a camel’s hair brush.

Attacks by parasites and predators also can be devastating to a rearing program. Carefully examine the host material when it is brought indoors and before it is placed in the rearing containers to lessen the possibility of predators and parasites being introduced accidentally. Also, place rearing cages where they will be safe from ants, mice, the family cat, and other predators.

FOOD

The choice of food depends on the species being reared. Some species are general feeders and will accept a wide assortment of food, including dead or decaying organic matter. Examples of general feeders are most ants, crickets, and cockroaches. Other groups are specific feeders, with food preferences so restricted that only a single species of plant or animal is acceptable. Carefully note at the time of collection the food being consumed by the specimen, and provide the same food in the rearing cages.

Carnivorous insects should be given prey similar to that which they normally would consume. This diet can be supplemented when necessary with such insects as mosquito larvae, wax moth larvae, mealworms, maggots, or other insects that are easily reared in large numbers in captivity. If no live food is available, a carnivorous insect sometimes may be tempted to accept a piece of raw meat dangled from a thread. Once the insect has grasped the meat, the thread can be gently withdrawn. The size of the food offered depends on the size of the insect being fed. If the offering is too large, the feeder may be frightened away.

Bloodsucking species can be kept in captivity by allowing them to take blood from a rat, mouse, rabbit, or guinea pig. A human should be used as a blood source only if it is definitely known that the insect or mite being fed is free of diseases that may be transmitted to the human.

Stored-product insects and mites are easily kept alive and breeding in containers with flour, grains, tobacco, oatmeal or other cereal foods, and similar products. Unless leaf-feeding insects are kept in flowerpot cages where the host plant is growing, fresh leaves from the host plant must usually be placed in the rearing cage daily and old leaves removed.

Light

Most species of insects and mites can be reared under ordinary lighting conditions; however, artificial manipulation of the light period will control diapause in many species. If the light requirements of the species being reared are known, it may be possible to adjust the period of light so that the specimens will continue to develop and will remain active instead of entering diapause, for example, providing 8-10 hours of light as opposed to 16 hours. Light and dark periods can be regulated with a 24-hour timing switch or clock timer. The timer is set to regulate light and dark periods to correspond with the desired lengths of light and darkness. It is important to remember that many insects and mites are very sensitive to light; sometimes even a slight disturbance of the photoperiod can disrupt their development.

Dormancy and Diapause

Insects and mites are unable to control the temperature of their environment; instead, they make physiological adjustments that allow them to survive temperature extremes. In regions with freezing winters, insects and mites have at least one stage that is resistant to low temperatures. The resistant form may be any stage—egg,larva, nymph, pupa, or adult. When winter arrives, only the resistant form survives. Dormancy is the physiological state of an insect or mite during a period of arrested development, whereas diapause is the prolonged period of arrested development brought about by such adverse conditions as heat, drought, or cold. This condition can be used to advantage in rearing. For example, if leaving rearing cages unattended for several days or longer is unavoidable, many (but unfortunately not all) specimens can be refrigerated temporarily to slow their activity and perhaps force diapause. This measure should be used with caution since the degree and duration of cold tolerated by different species will vary.

The reverse situation, that of causing diapause to end, is equally useful. Overwintering pupae that normally would not develop into adults until spring can be forced to terminate diapause early by chilling them for several weeks or months, then bringing them to room temperature so normal activity will resume. Often mantid egg cases are brought indoors accidentally with Christmas greenery. The eggs, already chilled for several months, hatch when kept at room temperature, often to the complete surprise and consternation of the unsuspecting homeowner.

Temperature

Of all the environmental factors affecting the development and behavior of insects and mites, temperature may be the most critical. Since arthropods are cold blooded, their body temperatures are usually close to the temperature of the surrounding environment, and their metabolism and development are directly affected by increases and decreases in temperature. Each stage of an insect or mite species has a low and a high point at which development ceases. These are called threshold temperature levels.

Most species that are collected and brought indoors for rearing can be held at normal room temperature; the optimum temperature for rearing will vary from species to species and with different stages of the same species. As with all rearing techniques, every attempt should be made to duplicate natural conditions. Specimens that normally would overwinter outdoors should be kept during the winter in rearing cages placed in an unheated room, porch, or garage. Never place an enclosed rearing cage in direct sunlight; the heat becomes too intense and may kill the specimens.

Moisture

The moisture requirements of insects and mites are varied. Examination of the habitat from which specimens were collected should provide clues about their moisture requirements in captivity. Many insects in the pupal stage are resistant to drought. Species that normally infest stored foods also require very little moisture; in fact, many produce their own water. Most species found outdoors require higher levels of humidity than are generally found indoors. Additional moisture can be added to indoor rearing cages in several ways. To increase the humidity in a cage, keep a moist pad of cotton on top of the screen cover of the cage, or place a moist sponge or a small glass vial filled with water in the cage. The mouth of the vial is plugged with cotton and the vial laid on its side so the cotton remains moist. Pupae may be held for long periods in moist sawdust, vermiculite, sphagnum, or peat moss. In a flowerpot cage, the water used to keep the plant alive should provide sufficient moisture for the plant feeding insects and mites. Spraying the leaves daily also may supplement moisture requirements in rearing cages. Too much moisture may result in water condensation on the sides of the cage, which may trap the specimens and damage or kill them. Excess moisture also enhances the growth of mold and fungus, which is detrimental to the development of most insects and mites. A 2-3 percent solution of table salt sprayed regularly in the cage will help prevent mold and fungus growth.

Containers for Rearing

To rear specimens successfully, simulate as closely as possible in the rearing cages the natural conditions under which the immatures were found. Almost any container will serve as a temporary cage for living insects or mites. One simple temporary cage that is very handy on field trips is a paper bag. Plant material or a soil sample containing insects or mites is placed in the paper bag, which is then sealed. A paper bag also can be placed over the top of a plant on which insects or mites are found. The bottom edge of the bag is tied tightly around the exposed stems, which are cut and placed in a jar of water. One disadvantage of using a paper bag is that i is not transparent, so it must be removed to observe the specimens or to determine when the foliage needs to be changed. Clear plastic bags are better suited to such viewing. Plastic bags wit a paper towel placed in the bottom are extrememly efficient rearing containers for leaf mining and other small moths. They require frequent inversion to minimize condensation.

Another simple temporary cage is a glass jar with its lid replaced by a piece of organdy cloth or gauze held in place by a rubberband. A few such jars in a collecting kit are useful for holding live insects. For aquatic species, using a watertight lid on the jars is advisable. If aquatic insects are to be transported over a considerable distance, fewer will die if the jar is packed with wet moss or leaves than if the specimens are allowed to slosh around in water alone. After arrival at your destination, release the insects into a good rearing container.

Aquatic insects can be reared in their natural habitat by confining them in a wire screen or gauze cage, part of which is submerged in water. Be sure to anchor the cage securely. The screen used in aquatic cages should be coarse enough to allow food to flow through, yet fine enough to retain the insects being reared. Certain aquatic insects may be reared readily indoors in an aquarium or
even in a glass jar. The main goal is to try to duplicate their natural habitat. If the specimen was collected from a rapidly flowing stream, it is unlikely to survive indoors unless the water is aerated. Other insects do well in stagnant water. Aquatic vegetation usually should be provided in the aquarium even for predaceous specimens, such as dragonfly nymphs, which often are found clinging to underwater stems. Keep sufficient space, which will vary according to the insect being reared, between the surface of the water and the screen or gauze cover over the aquarium to allow the adult insect to emerge. A dragonfly, for example, needs considerable space, plus a stick, rock, or other object on which to perch after emerging so that the wings will develop fully.

Most adult insects, both terrestrial and aquatic, are teneral when they first emerge and should not be killed until the exoskeleton and wings harden and the colors develop fully. This may be a matter of minutes, hours, or even days. It is advisable to keep even small flies alive for 1 full day after they emerge. Specimens killed while still teneral will shrivel when mounted. Some insects, if kept in cages too long after emerging, especially butterflies and moths, will beat their wings against the cage and lose many scales or tear their wings. Providing adequate space in which emerging insects may expand their wings fully and move about slightly is therefore critical in th design of rearing cages.

Beetles and other boring insects often are abundant in bark and wood. If pieces of such material are placed in glass or metal containers, excellent specimens of the adults may be obtained, although sometimes not for a considerable time. Cages made of wood or cardboard are not suitable for such insects because those found in wood or bark usually are well equipped, both in immature and adult stages, to chew their way through a cage made of such material and thus escape.

A flowerpot cage is one of the best containers for rearing plant-feeding species over an extended period. The host plant, if its size and habitat permit, is placed in a flowerpot, and a cylinder of glass, plastic, or wire screen is placed around the plant.

Pheromones and Other Attractants

Substances naturally produced by insects to attract others of their own kind are known as pheromones. They are often used in traps to aid in controlling pest species. Most pheromones are highly specific, attracting only one species or a group of closely related species. “Spanish Fly” (cantharidin) has recently come into use as an extremely effective attractant for various beetles, such as pedilids, and bugs, such as bryocerines. Female specimens of certain insects, such as cicadas and silkworm moths, may be placed alive in a trap and used as a bait with their pheromones and the sounds they produce attracting males. Female saturniids (silkworm moth) may be used to attract males which may come from great distances. The pheromones of sesiid moths are commercially available and can be attached to the collector's net or hung over a dish with ethylene glycol.

Host animals likewise may be used as bait for various bloodsucking insects, with or without constructed traps. Carbon dioxide in the form of “Dry Ice,” cylinder gas, or marble chips treated with an acid such as vinegar serves as an attractant for certain insects and has been very successful in attracting horse flies to Malaise and Manitoba traps.

Baiting With Feces

Animal and human feces attract many insects. A simple but effective method of collecting such insects is to place fresh feces on a piece of paper on the ground and wait a few minutes. When a sufficient number of insects have arrived, a net with its bag held upward can be brought carefully over the bait about 1 meter above it. This will not disturb the insects, nor will they be greatly disturbed when the net is lowered gently about two- thirds of the distance to the bait. At this point, the net should be quickly lowered until its rim strikes the paper. The insects, mostly flies, will rise into the net, which may then be lifted a short distance above the bait and quickly swung sideways, capturing the insects in the bottom of the bag. In about half an hour, many flies can be caught, virtually all that have come to the bait. Because of this, the ‘baiting with feces’ method may be used for quantitative studies .

Feces are most attractive to insects during the first hour after deposition, but insects coming for a more extended period may be captured by placing a canopy trap over the feces or by using the feces with the cereal dish trap . Emergence traps placed over old feces will capture adult insects emerging from immature forms feeding there. The same methods also may be used with other baits, such as decaying fruit, small carcasses, and a wide variety of other substances.

Baiting with flowers (mixed with brown sugar)


Picture: By Mr Johari Jalinas

Baits, Lures, and Other Attractants


Any substance that attracts insects may be used as a bait. Natural products, chemicals derived therefrom or synthesized, and secretions of the insects themselves may all be used as attractants. Mere exposure of the substance may be considered as setting up a trap, and attractive substances are used in many constructed traps.Sugaring for moths, one of the oldest collecting methods, involves the use of a specially prepared bait in which some form of sugar is an essential component.

The bait may be refined or brown sugar, molasses, or sirup. Such substances often are mixed with stale beer, fermented peaches, bananas, or some other fruit— there is no standard formula. Each lepidopterist has his or her own favorite recipe. One particularly satisfactory recipe uses fresh, ripe peaches; culls or windfalls are suitable. Remove the seeds but not the skins, mash the fruit, then place it in a 4-liter (1-gal) or larger container of plastic, glass, stainless steel, enamelware, or crockery with a snugly fitting but not tight cover. Avoid using metal containers that may rust or corrode. Fill each container only onehalf to two-thirds full to allow space for expansion. Add about a cup of sugar and place in a moderately warm place for the mixture to ferment.

The bubbling fermentation reaction should start in a day or so and may continue for 2 weeks or more, depending on the temperature. During this time, check the fermentation every day or every other day and add sugar until fermentation appears to have subsided completely. As the added sugar is converted to alcohol, the growth of yeast slows and eventually ceases.

After fermentation ceases, the bait should remain stable and should then be kept in tightly sealed containers to prevent contamination and evaporation. If the mixture is allowed to run low in sugar during the fermentation process, vinegar will be produced instead of alcohol. It is therefore important to smell the bait periodically and to add plenty of sugar to avoid this. The amount of sugar consumed will be surprising, usually over 0.4 kg per liter (3.3 lb per gal). The bait should have a sweet, fruity, winelike fragrance. A trace of vinegar is not objectionable but is better avoided. Canned fruit, such as applesauce, may also be used to make the bait, but inasmuch as such products are completely sterile, a small amount of yeast must be added to start fermentation. Although the bait may seem troublesome to prepare, it keeps for years and is thus available at any time, even when fruit is not in season.

Immediately before use, the bait may be mixed with 30 to 50 percent molasses or brown sugar or a mixture of these. This thickens the bait so that it will not dry out so quickly, and it makes the supply last longer.The best time to set out the sugar bait is in the early evening before dark. It may be applied with a paint brush in streaks on tree trunks, fenceposts, or other surfaces. Choose a definite route, such as along a trail or along the edge of a field, so that later you can follow it in the dark with a lantern or flashlight. Experienced collectors learn to approach the patches of bait stealthily with a light in one hand and a killing jar in the other to catch the moths before they are frightened off. Some collectors prefer to wear a headlamp, leaving both hands free. Although some moths will fly away and be lost, a net usually is regarded as an unnecessary encumbrance, because moths can be directed rather easily into the jar. Sugaring is an especially useful way to collect noctuid moths, and the bait applied in the evening often will attract various diurnal insects on the following days. The peach bait previously described has been used in butterfly traps with spectacular results. However, collecting with baits is notoriously unpredictable, being extremely productive on one occasion and disappointing on another, under apparently identical conditions.

Snap Traps

Two kinds of traps designed for quantitative sampling may be termed “snap traps.” It consists of a pair of wooden or plastic discs, slotted to the center so as to fit on a tree branch and connected to each other by a pair of rods. A cloth cylinder is affixed at one end to one of the discs and at the other end to a ring sliding on the rods.

After the cloth cylinder has been pulled to one end and has been secured in place, the ring is held by a pair of latches. When insects have settled on the branch, its leaves, or flowers, the latches are released by pulling on a string from a distance, and the trap is snapped shut by a pair of springs on the rods, capturing any insects present. One of the canopy traps operates in a similar fashion. When a remotely controlled latch is pulled, a spring-loaded canopy is snapped over an area of soil, and insects within the canopy are collected by suction or a vacuum device. This trap was designed for use in grasslands.

Sticky Traps

In this type of trap, a board, piece of tape, pane of glass, piece of wire net, cylinder, or other object, often painted yellow, is coated with a sticky substance and suspended from a tree branch or other convenient object. Insects landing on the sticky surface are unable to extricate themselves. The sticky material is later dissolved with a suitable solvent, usually toluene, xylene, ethylacetate, or various combinations of these, and the insects are washed first in Cellosolve and then in xylene.

This type of trap should not be used to collect certain specimens, such as Lepidoptera, which are ruined by the sticky substance and cannot be removed without being destroyed. Various sticky-trap materials are available commercially, some with added attractants. However, use caution in selecting a sticky substance because some are difficult to dissolve.

References: Buriff 1973; Chiang 1973; Dominick 1972; Edmunds et al. 1976; Evans 1975; Gillies & Snow 1967;

Baiting with rotten banana


Picture: by Mr Johari Jalinas

Emergence and Rearing Traps


New Jersey Trap

An emergence trap is any device that prevents adult insects from dispersing when they emerge from their immature stages in any substrate, such as soil, plant tissue, or water. A simple canopy over an area of soil, over a plant infested with larvae, or over a section of stream or other water area containing immature stages of midges, mayflies, and other arthropods will secure the emerging adults. If it is equipped with a retaining device, as in the Malaise trap, the adults can be killed and preserved shortly after emergence.

It must be remembered, however, that many insects should not be killed too soon after emergence because the adults are often teneral or soft bodied and incompletely pigmented and must be kept alive until the body and wings completely harden and colors develop fully. Emergence traps and rearing cages enable the insects to develop naturally while insuring their capture when they mature or when larvae emerge to pupate.

References: Adkins 1972; Akar and Osgood 1987; Banks et al. 1981; Barber & Mathews 1979; Butler 1966; Catts 1970; Cheng 1975; Coon & Pepper 1968

Pitfall and Dish Traps


Pitfall Trap


Cereal Dish Trap

Another simple but very effective and useful type of interception trap consists of a jar, can, or dish sunk in the earth . A cover must be placed over the open top of the jar to exclude rain and small vertebrates while allowing insects and mites to enter. A piece of bark, wood, or flat stone will serve this purpose.

Pitfall traps may be baited with various substances, depending on the kind of insects or mites the collector hopes to capture. Although most that fall into the trap will remain there, it should be inspected daily, if possible, and desired specimens removed and placed in alcohol or in a killing bottle while they are in their best condition.

Light Trap


Light Trap-picture by Mr Johari Jalinas


A light sheet in the field is highly effective method of using light to
attract moths and other nocturnal insects

This is simply a cloth sheet, usually a white bedsheet, hung outdoors at night with an appropriate light source or combination of sources such as ultraviolet fluorescent tubes, gasoline lanterns, or automobile headlights placed a few feet in front of it. As insects are attracted and alight on the sheet, they are easily captured in cyanide bottles or jars by the collector who stands in attendance or at least checks the sheet frequently. The sheet may be pinned to a rope tied between two trees or fastened to the side of a building, with the bottom edge spread out on the ground beneath the light. Some collectors use supports to hold the bottom edge of the sheet several centimeters above the ground so that no specimens can crawl into the vegetation under the sheet and be overlooked. Other collectors turn up the edge to form a trough into which insects may fall as they strike the sheet.

The light sheet remains unsurpassed as a method of collecting moths in flawless condition or of obtaining live females for rearing purposes. Its main disadvantage is that species that fly very late or those that are active only in the early morning hours may be missed unless one is prepared to spend most of the night at the sheet. Many other insects besides moths are attracted to the sheet, and collectors of beetles, flies and other kinds of insects would do well to collect with this method.

It should be emphasized that the phases of the moon may influence the attraction of insects to artificial light. A bright moon may compete with the light source resulting in a reduced catch. The best collecting period each month extends from the fifth night after the full moon until about a week before the next full moon.

References (light traps and sheets):

Andreyev et al. 1970; Apperson & Yows 1976; Barr et al. 1963; Barrett et al. 1971; Bartnett & Stephenson 1968; Belton & Kempster 1963; Belton & Pucat 1967; Blakeslee et al. 1959; Breyev 1963; Burbutis & Stewart 1979;

Malaise Traps


Malaise trap is one of the most widely used insect traps was developed by he Swedish entomologist René Malaise and that now bears his name. Several modifications of his original design have been published, and at least one is available commercially. The trap, as originally designed, consists of a vertical net serving as a baffle, end nets, and a sloping canopy leading up to a collecting device .

The collecting device may be a jar with either a solid or evaporating killing agent or a liquid in which the insects drown. The original design is unidirectional or bidirectional with the baffle in the middle, but more recent types include a nondirectional type with cross baffles and with the collecting device in the center. Malaise traps have been phenomenally successful, sometimes collecting large numbers of species that could not be obtained otherwise. Attractants may be used to increase the efficiency of the traps for special purposes.

References: Butler 1966; Townes 1972; Steyskal 1981 (bibliography).

Windowpane Traps

One of the simplest and cheapest traps is a barrier consisting of a windowpane held upright by stakes in the ground or suspended by a line from a tree or from a horizontal line. A trough filled with a liquid killing agent is so placed that insects flying into the pane drop into the trough and drown. They are removed from the liquid, washed with alcohol or other solvent, then preserved in alcohol or dried and pinned. The trap is not recommended for adult Lepidoptera or other insects that may be ruined if collected in fluid.

A modification of this trap uses the central "pane" of a malaise trap instead of a pane of glass. The malaise trap pane covers more space than glass, is easier to transport, and, of course, is not breakable. Various mesh sizes if cloth can also be used depending on the insects targeted. These traps may also be referred to as flight intercept traps.

References: Chapman & Kinghorn 1955; Corbet 1965; Kato et al. 1966; Lehker & Deay 1969; Masner and Goulet 1981; Nijholt & Chapman 1968; Peck and Davies 1980; Roling & Kearby 1975; Wilson 1969.

The Berlese or Tullgren funnel


The Berlese or Tullgren funnel and its modifications are cleaner and more efficient than sifting to separate insects and mites from leaf mold and similar materials. The sample (usually presifted to remove large debris) is placed on a screen near the top of a funnel. A light bulb can be placed above the sample to produce heat and light, which drive the insects downward into the funnel, or heated coils or a jacket around the funnel can be used to dry the sample and make it inhospitable.

The insects and mites are directed by the funnel into a container, sometimes containing alcohol at the bottom of the funnel. Care should be taken not to dry the sample so rapidly that slow-moving specimens are immobilized before they can leave the sample. To prevent large amounts of debris from falling into the container, place the sample on the screen before the container is put in place.

Sifters

Sifters are used to collect insects and mites that live in ground litter, leaf mold, rotting wood, mammal and bird nests, fungi, shore detritus, lichens, mosses, and similar material. Sifters are especially useful for winter collecting to pick up hibernating specimens. Almost any container with a wire-mesh screen bottom will serve as a sifter. The size of the mesh depends on the size of the specimens sought.

For general purposes, screening with 2.5-3 meshes per centimeter is satisfactory. To use the sifter, place the material to be sifted into the container and shake it gently over a white pan or piece of white cloth. As the insects and mites fall onto the cloth, they may be collected with forceps, a brush, or an aspirator

Aspirators and Suction Devices


The aspirator (fig A), known in England as a ‘pooter,’ is a convenient and effective device for collecting small insects and mites. The following materials are needed to construct an aspirator:

(1) Vial 2.5-5 cm in diameter and about 12 cm long.

(2) Two pieces of glass or copper tubing about 7 mm in diameter, one piece about 8 cm long and the other about 13 cm long.

(3) Rubber stopper with two holes in which the tubing will fit snugly.

(4) Piece of flexible rubber or plastic tubing about 1 meter long, with diameter just large enough to fit snugly over one end of shorter piece of stiff tubing.

(5) Small piece of cloth mesh, such as cheesecloth, and rubberband.

Beating Sheets

A beating sheet should be made of durable cloth, preferably white, attached to a frame about 1 meter square, with two pieces of doweling or other light wood crossing each other and fitted into pockets at each corner of the cloth. An ordinary light-colored umbrella also may be used as a beating sheet. Place the beating sheet or umbrella under a tree or shrub and sharply beat the branches or foliage with a club or stick. Specimens will fall onto the sheet and may be removed from the light-colored material by hand or with forceps, a moistened brush, or an aspirator.

Locating specimens on the sheet is sometimes a problem because of leaves or other unwanted material dropping onto the sheet. Watching for movement will help locate specimens, as well as tilting the sheet so that the debris is displaced or even allowed to fall off, with the insects and mites left clinging to the cloth.

Beating sheets are especially useful in collecting beetles, true bugs, and larval Lepidoptera. Beating may be the best collecting technique when the weather has turned cold, or early and lat in the day, when normally active insects seek shelter in vegetation and are otherwise difficult to detect

Solid Killing Agents

The solid killing agents most often used in killing jars are the cyanides—

1) Potassium cyanide (KCN),
2) Sodium cyanide (NaCN)
3) Calcium cyanide [Ca(CN)2].

*very dangerous, rapid acting poisons with no known antidote*!!

Killing jars or bottles will last longer and give better results if the following simple rules are observed:

(1) Place a few narrow strips of absorbent paper in each jar or bottle to keep it dry and to prevent specimens from mutilating or soiling each other. Replace the strips when they become moist or dirty. This method is useful for most insects except Lepidoptera, which are too difficult to disentangle without damage.

(2) Do not leave killing jars in direct sunlight as they will sweat and rapidly lose their killing power.

(3) If moisture condenses in a jar, wipe it dry with absorbent tissue.

(4) Keep delicate specimens in separate jars so that larger specimens will not damage them.

(5) Do not allow a large number of specimens to accumulate in a jar unless it is to be used specifically for temporary storage.

(6) Do not leave insects in cyanide jars for more than a few hours. The fumes will change the colors of some insects, especially yellows to red, and specimens will generally become brittle and difficult to handle.

(7) If it is necessary to keep insects in killing jars for more than several hours, place the specimens in another container and store them in a refrigerator.

(8) Keep butterflies and moths in jars by themselves so that their hairs and scales will not ruin other kinds of insects.

(9) Never test a killing jar by smelling its contents.

(10) Old jars that no longer kill quickly should be recharged or disposed of by burning or burying.

Killing Jars or Bottles


Killing Jars

Jars for use with liquid killing agents are prepared in one of two ways. One way (fig. A) is to pour about 2.5 cm of plaster of paris mixed with water into the bottom of the jar and allow the plaster to dry. Enough of the killing agent is then added to saturate the plaster; any excess should be poured off. This kind of jar can be recharged merely by adding more killing agent.

The second method is to place a wad of cotton or other absorbent material in the bottom of a jar, pour enough liquid killing agent into the jar to nearly saturate the absorbent material, and then press a piece of stiff paper on it or a cardboard cut to fit the inside of the jar tightly. The paper or cardboard acts as a barrier between the insect and the killing agent, keeping the latter from evaporating too rapidly and also preventing the specimen from becoming entangled in loose fibers.

Among the liquid killing agents are ethyl acetate (CH3CO2 • C2H5), ether (diethyl ether, C2H5 • O • C2H5), chloroform (CHCI3), and ammonia water (NH4OH solution). Ethyl acetate is most widely used. All of these chemicals are extremely volatile and flammable and should never be used near fire. Children should only use them under adult supervision. Ethyl acetate is regarded by many as the most satisfactory liquid killing agent. Its fumes are less toxic to humans than those of the other substances. Although it usually stuns insects quickly, it kills them slowly.

Specimens that appear dead may revive if removed from the killing jar too soon, but a compensating advantage is that most specimens may be left in an ethyl acetate killing jar for several days and still be limp. If the ethyl acetate is allowed to evaporate from the specimens, they will harden. Killing jars with ethyl acetate are preferred by many entomologists, especially for infrequent use.

Ether and chloroform are both extremely volatile and flammable and should not be used near an open flame or lighted cigarette. Their high volatility makes them serviceable in a killing jar for only a short time. Perhaps the greatest hazard with chloroform is that even when stored in a dark-colored jar, it eventually forms the extremely toxic gas phosgene (carbonyl chloride, COCI2). Chloroform, however, is useful when other substances cannot be obtained. It stuns and kills quickly but has the disadvantage of stiffening specimens.

Ethyl Alcohol (ethanol or ETOH) is widely used to kill small Coleoptera adults, small Hymenoptera, and many immature insects and soft-bodied insects. It is most commonly used at 70-80% concentration and many workers add 5% glacial acetic acid ("acetic alcohol") which helps penetration of the alcohol into the specimen and leaves specimens more relaxed. Isopropyl alcohol (rubbing alcohol) may also be used, and may be easier to find and purchase than Ethanol. However, Ethanol is preferred for most applications. Ethanol is used commonly in Berlese funnels and similar traps

Liquid ammonia is irritating to humans, and in general is not a particularly effective killing agent for most insects. However, it is highly recommended for use in small vials for dispatching microlepidoptera, and it has been used with variable success in blacklight traps, again for Lepidoptera. Specimens killed in ammonia tend to stay in a relaxed condition much longer than those killed by cyanide, allowing greater ease of spreading. Ammonia is readily available from many sources. Ammonium carbonate, a solid but volatile substance, also can be used.


References:

M. E. SCHAUFF. COLLECTING AND PRESERVING INSECTS AND MITES: TECHNIQUES AND TOOLS. Systematic Entomology Laboratory, USDA.

Collecting Nets


Sweeping Net- by Johari Jalinas

Collecting nets come in three basic forms:


1) Aerial Net- Collecting butterflies and other flying insects
2) Sweeping Net- Collecting butterflies and other flying insects
3) Aquatic Net- Collecting aquatic insects

Equipment and Collecting Methods


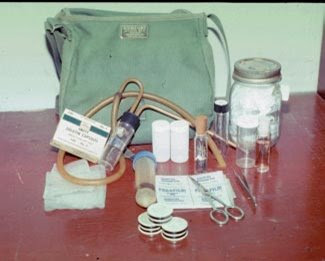
A field collecting kit.

The following items usually are included in the general collector’s bag:

(1) Forceps. Fine, lightweight forceps are recommended; if sharp-pointed forceps are used, care must be taken not to puncture specimens. If possible, grasp specimens with the part of the forceps slightly behind the points.

(2) Vials containing alcohol or other preservatives

(3) Killing bottles of various sizes.

(4) Small boxes or containers for storing specimens after their removal from killing bottles. These may be made of cardboard, plastic, or metal and should be partly
filled with soft tissue or cloth to keep specimens from rolling about. Do not use cotton because specimens become entangled in the fibers and may become virtually impossible to extricate without damage.

(5) Small envelopes for temporary storage of delicate specimens and/or gelcaps for tiny specimens.

(6) One or more aspirators .

(7) Absorbent tissue for use in killing bottles and aspirators.

(8) Notebook and writing equipment for jotting down notes and label data.

(9) A strong knife for opening galls, seed pods, twigs, etc and a pair of scissors for cutting labels.

(10) A small, fine brush (camel’s hair is best) for picking up minute specimens. Moisten the tip; tiny specimens will adhere to it and may be transferred to a killing bottle or vial.

(11) Bags for storing plant material, rearing material, or Berlese samples. For collecting much plant material, a botanist’s vasculum or tin box is advisable.

(12) A hand lens.

Wednesday, April 30, 2008

Journal-Serangga


volume 10 number1-2 November2005

A journal published by the Centre for Insect Systematics, Universiti Kebangsaan Malaysia in collaboration with Departments on Museums Malaysia, Ministry of Culture, Arts and Heritage, Malaysia

Published in Malaysia by
Centre for Insect Systematics
(Pusat Sistematik Serangga)
Universiti Kebangsaan Malaysia
43600 Bangi, Selangor Darul Ehsan,
Malaysia.

Friday, April 4, 2008

Positive and Negative of Insects

Positive

Agriculture: biocontrol, pollination
e.g. parasitoid wasps, predators, honey bees, solitary bees

Medicine: antibiotics, chronic disease treatment, maggot
debridement, apitherapy
e.g. honey bee venom, maggots

Commerce: products, cochineal, silk, wax, honey
e.g. scale insects, silk moth, honey bees

Science: research subjects: genetics, ecology, physiology, behavior
e.g. vinegar “fruit” flies, tobacco hornworm, honey bees

Aesthetics: art & inspiration
e.g. butterflies, beetles, fireflies

Food: nutrition, environmental& economic sustainability
e.g. 500 species, 17 families, especially grubs & caterpillars

Negative

Agriculture: competition for food & fiber
e.g. apple maggot, bark beetles

Domestic: damage to property & goods
e.g. termites, silverfish,

Medicine: parasites & disease
e.g. malaria, J.E,Aedes, screw worm fly

Wednesday, April 2, 2008

Specimens in Vials and Labeling Vials


Specimens in Vials.

The following procedures are recommended for shipping vials:

  1. Fill each vial with liquid preservative. Stopper tightly by holding a pin or piece of wire between the vial and the stopper to permit air or excess fluid to escape, then remove the pin or wire. Make certain that cork stoppers do not have defects that will allow leakage. Screw-top vials should be firmly closed and sealed with a turn and a half of plastic adhesive tape or Parafilm around the lower edge of the cap and part of the vial.
  2. Wrap each vial with cotton, tissue, paper toweling, or similar material. Allow no piece of glass to come into contact with another piece of glass. Several vials may be wrapped together or held with tape or rubberbands as a unit, or they may be placed in a small cardboard box with enough packing to insure that they are not shaken around


Labeling Vials

Material in fluid should be accompanied by a single label large enough to include all data. The label should be written with a moderately soft lead pencil or in India ink and well dried so that it will not dissolve or run when immersed in the liquid. Do not use a ballpoint or felt-tip pen. Hard lead pencil writing becomes illegible in liquid. Do not fold the label. Small specimens may be damaged or lost when the label is removed. Multiple labels or labels small enough to float around in the vial may also damage specimens, and when two labels lie face, they cannot be read. Always place labels inside the vial as there is the danger that if left outside a vial, regardless of the method or substance used to affix them, they may become defaced, destroyed, or detached.

Insect Storage Box


Insect Box

Insect Storage Boxes in varying shapes and sizes are most commonly used in biology laboratories for storing different insects. Since dead insects are very delicate, it is important to store them carefully, in order to make them last for years.

Types of Insect Storage Box
There are various boxes available for storing insects, made from different materials and having different size, some of the popularly used boxes are:
  • Schmitt Box: This box provides an economical solution for storing pinned specimens. The box makes use of polyethylene foam for standard protection.
  • Riker Mounts: This box does not use the pinning method for storage, these are provided with cotton backing and a glass top for storing insects on the soft cotton base.
  • Cigar Box: These are corrugated cardboard boxes, suitable for short term use and do not provide much protection.

These boxes are a cost effective option for storing and displaying insect collection. The boxes are specially designed with pinning base to protect mounted specimens. The pinning base is generally made of polyethylene foam. These boxes are airtight, for providing security and protection from moths and other pests and insects.

Use of Insect Storage Box
  • Biology Laboratory
  • Museums
  • Educational Laboratory

Liquid Killing Agents


Ethyl Acetate

Among the liquid killing agents are ethyl acetate (CH3Co2.C2H5), ether (diethyl ether, C2H5.o.C2H5), chloroform (CHCI3), and ammonia water(NH4OH solution). Ethyl acetate is most widely used. All of these chemicals are extremely volatile and flammable and should never be used near fire. Children should only use them under adult supervision.

Ethyl acetate is regarded by many as the most satisfactory liquid killing agent. Its fumes are less toxic to humans than those of other substances. Although it usually stuns insects quickly, it kills them slowly.

Spreading Board for Lepidoptera


A typical spreading board for Lepidoptera

All insects preserved with the wings spread uniformly are set and dried in this position on spreading boards or blocks; spreading boards are more commonly used than spreading blocks. Although such pinning aids vary greatly in design, the same basic principle is inherent in all, that is, a smooth surface on which the wings are spread and positioned horizontally; a central, longitudinal groove for the body of the insect; and a layer of soft material into which the pin bearing the insect is inserted to hold the specimen at the proper height. An active collector will need from several to many spreading boards because the insects must dry for a considerable time (about 2 weeks for large specimens, one week for small ones) before being removed from the boards

Tuesday, April 1, 2008

Collecting Nets


Collecting nets come in three basic forms: Aerial, sweeping, and aquatic. The first is designed especially for collecting butterflies and other flying insects. Both the bag and handle are relatively lightweight. The sweeping net is similar to the aerial net but is stronger and has a more durable bag to withstand being dragged through dense vegetation. Aquatic nets are used for gathering insects from water and are usually made of metal screening or heavy scrim with a canvas band affixed to a metal rim. A metal handle is advisable because wooden ones may deteriorate after repeated wetting. The net you choose depends on the kind of insects or mites you wish to collect.

Reference:

M.E.Schauff. Collecting and Preserving Insects and Mites, Techniques and Tools, , Systematic Entomology Laboratory, USDA, National Museum of Natural History, NHB 168.page 6. 2007

video-Cicada Molting


Monday, March 31, 2008

Cicada Molting


Cicada is an insect of the order Hemiptera, suborder Auchenorrhyncha, in the superfamily Cicadoidea.

Physical Appearance:

  • Large eye apart on the head and usually transparent
  • well-veined wing
  • membranous front wings
  • short antennae protruding between or in front of the eyes

The adult insect, sometimes called an imago , is usually 2 to 5 cm (1 to 2 inches ) long, although some tropical species can reach 15 cm (6"), e.g. Pomponia imperatoria from Malaysia.

After mating, the female cuts slits into the bark of a twig, and into these she deposits her eggs. She may do so repeatedly, until she has laid several hundred eggs. When the eggs hatch, the newborn nymphs drop to the ground, where they burrow. Most cicadas go through a life cycle that lasts from two to five years. Some species have much longer life cycles up to 13-year life cycle depends on their species.

The insects spend most of the time that they are underground as nymphs at depths ranging from about 30 cm (1 ft ) up to 2.5 m (about 8½ ft). The nymphs feed on root juice and have strong front legs for digging.

In the final nymphal instar , they construct an exit tunnel to the surface and emerge. They then moult (shed their skins), on a nearby plant for the last time and emerge as adults. .


This picture shows the abandoned skins remain, still clinging to the bark of trees. I took these pictures during the fieldwork at Ulu Bendul, Negeri Sembilan, Malaysia.

There are so many exoskeleton of Cicada after the molting process.


I got a young cicada at the tract of Ulu Bendul Waterfall.

Cicada molting

Sunday, March 30, 2008

Post Doct Fellow- CIS UKM


Dr. Muhammad Rahim Khan
Post.Doc. Fellow UKM (February 2008- December 2008)
Nationality: Pakistani
Specialty: Agricultural Entomology
Research Area of PHD: Integrated Pest Management (IPM)
Profession: Associate Professor in Kashmir University
Special Interest: Flori culture (Having own Flori culture farm in Kashmir)
E-mail: mrkhan40@yahoo.com

Thursday, March 27, 2008

Secretary of CIS


Mr.Johari Jalinas
Secretary CIS/Tutor
School of Environmental and Natural Resource Sciences,
Universiti Kebangsaan Malaysia,
Campus Bangi,
Bangi, Selangor Darul Ehsan,
Malaysia.
No.Phone: 0172713033
E-mail: johari_j@ukm.my, joharijalinaszakaria@gmail.com

PHD Students-CIS


Name: Norhafiza Ahmad Fazili
Field of Study: PHD Entomology(UKM)
Systematic (Subfamily Ichneumoninae)
July 2007-July 2009
E-mail: norhafiza_ahmadfazili@yahoo.com


Name: Asmanizar
Field of Study: Phd Entomology
Research:Pest Storage
E-mail:nizar_312@yahoo.com
Position: Lecturer of Entomology,Faculty of Agriculture, Islamic University of North Sumatera, Indonesia.


Name:Izfa Riza Hazmi
Field of Study: PHD Insect Systematic
Coleoptera (Chrysomelidae)
Place of Study: Universitat Koblenz-Landau, Germany
(17th of March 2008-16th of March 2011)
E-mail: ladies_ifza@yahoo.com


Name: Alia Rizki
Field of Study: PHD Zoology
Research in Taxonomy, Phylogeny and Biogeography of genus Bactrocera Macquat
(Diptera: Tephritidae) of Malaysia.
Julay 2007-July 2010
E-mail: alia_rizki@yahoo.com

Research Assistant-CIS


Name: Muhamad Fahmi Bin Muhamad Halil
Position: Research Assistant Prof Dr. Idris Abd Ghani
E-mail: mfahmi85@yahoo.com

Master Students-CIS


Name: Norliyana Haslin Binti Alias
Field of Study: Msc Zoology (UKM)
Research in Diversity of Braconidae specific in Subfamily Orgilinae
(July 2007-July 2009)
E-mail: norliemy@yahoo.com


Name: Norhaslinda Binti Arun
Field of Study: Msc Entomology(UKM)
Fauna (Cicada) Homoptera in Johor
(July 2007-July 2008)
E-mail: norhaslindarun81@yahoo.com


Name: Tamalia Amanda Putri Binti Othman
Field of Study: Msc Zoology (UKM)
Research in Taxanomy- Genus: Theronia in Malaysia
(July 2007-July 2009)